Hello Pilots!
If you are reading this post, you have probably purchased Pilot Buddy and you are putting it to good use. I hope very much that the app does good things for you. I also hope that you will let me know what it does well and what it doesn't do well so that I can improve it! Please drop me an email at cdjohns@gmail.com with any suggestions you have for the app. I really do want to make it as useful a tool as possible!
Also, if you would like to help me continue to improve Pilot Buddy, it would be much appreciated if you would provide a positive review and rating on iTunes for the app. The rating system on iTunes is heavily biased by people that buy apps for the wrong reasons, and then love to blame the app for why it doesn't meet their needs. I need positive reviews to help me continue to sell Pilot Buddy, and that will help me continue to support it and improve it! So please, visit iTunes and provide your positive reviews!
Thanks again,
Chuck
Friday, January 8, 2010
Saturday, January 2, 2010
Pilot Buddy Help
If you have any problems with this app, please email me and I will try to help resolve the issue. You can contact me at cdjohns@gmail.com, or use the "Email the Developer Link" below. Also, I welcome all ideas for how to improve Pilot Buddy.
Using Pilot Buddy
Step 1: Setting Up Pilot Buddy
Use the "Settings" Tab to setup your basic information. These defaults will be used when creating new Flight entries. Also, your starting Pilot Log information should be entered so that Pilot Buddy can calculate your totals appropriately.
Step 2: Setting up Airports
You should setup Airport information for any place you plan to fly. This will need to be setup before you create a Flight entry that uses that Airport. When setting up Airports, you can use the "Lookup" feature to help fill in the information. This requires you have internet connectivity. ALWAYS double check the frequency information that this lookup brings back. For best results, fill in as many of the Airport's data fields as possible.
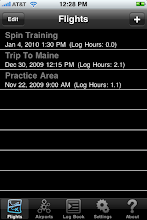
Step 3: Creating new Flights
On the Flights view, you can create a new flight by using the "+" button.
On the Preflight Tab, you setup your Depature and Arrival Airports, plus any planned stops. These make up the Legs of your flight. Use the Current Leg selector to set the current leg you are flying. This will adjust the Airport Info on the Depature and Arrival Tabs. Also, whenever you change the planned Airport Stops, or change the Current Leg, the fields on the other tabs are cleared to avoid stale data.
You can use the Depature, Enroute, and Arrival Tabs to aid in your flight. These tabs provide the basic data you will need for communications. Also, there are fields you can use to capture the ATIS information.
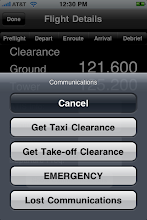
4. Help with Communications
At the bottom of each of the tabs in the Flight Plan (e.g. Depature, Enroute, etc.) there is a "Show Communications" button. This can be used to show you a reminder of the Communication Calls that you will need to make during your flight. These scripts are adjusted according to the settings in your Flight Plan (e.g. if you have Flight Following enabled, you will see Flight Following related calls). Also, the communication scripts will show as much data as you have provided. So again, it's important to fill in as much of the details of the flight and airports as possible.
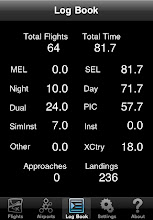
5. The Log Book
Pilot Buddy can be used to maintain a basic log book. Use the Debrief Tab on each flight to specify your flight hours. The Total Hours for the flight is determined by the Hobbs values at the start and end of the flight. You can quickly setup the various time fields by pressing the button next to the field (e.g. the SEL button will put the hours into that field, and will zero out the MEL field). There is a "Check Time" button that you can use to help validate your numbers, but please continue to be dliligent about your time keeping. Pilot Buddy doesn't check for every possible data error.
The Log Book tab can be used to view your total logged time. This uses the information from the Settings tab as the starting point, then adds each flight in Pilot Buddy to the total. Note: Total Hours is always calculated as Day Hours + Night Hours. Be sure that the sum of these 2 values equal your total flight time.
Using Pilot Buddy
Step 1: Setting Up Pilot Buddy
Use the "Settings" Tab to setup your basic information. These defaults will be used when creating new Flight entries. Also, your starting Pilot Log information should be entered so that Pilot Buddy can calculate your totals appropriately.
Step 2: Setting up Airports
You should setup Airport information for any place you plan to fly. This will need to be setup before you create a Flight entry that uses that Airport. When setting up Airports, you can use the "Lookup" feature to help fill in the information. This requires you have internet connectivity. ALWAYS double check the frequency information that this lookup brings back. For best results, fill in as many of the Airport's data fields as possible.
Step 3: Creating new Flights
On the Flights view, you can create a new flight by using the "+" button.
On the Preflight Tab, you setup your Depature and Arrival Airports, plus any planned stops. These make up the Legs of your flight. Use the Current Leg selector to set the current leg you are flying. This will adjust the Airport Info on the Depature and Arrival Tabs. Also, whenever you change the planned Airport Stops, or change the Current Leg, the fields on the other tabs are cleared to avoid stale data.
You can use the Depature, Enroute, and Arrival Tabs to aid in your flight. These tabs provide the basic data you will need for communications. Also, there are fields you can use to capture the ATIS information.
4. Help with Communications
At the bottom of each of the tabs in the Flight Plan (e.g. Depature, Enroute, etc.) there is a "Show Communications" button. This can be used to show you a reminder of the Communication Calls that you will need to make during your flight. These scripts are adjusted according to the settings in your Flight Plan (e.g. if you have Flight Following enabled, you will see Flight Following related calls). Also, the communication scripts will show as much data as you have provided. So again, it's important to fill in as much of the details of the flight and airports as possible.
5. The Log Book
Pilot Buddy can be used to maintain a basic log book. Use the Debrief Tab on each flight to specify your flight hours. The Total Hours for the flight is determined by the Hobbs values at the start and end of the flight. You can quickly setup the various time fields by pressing the button next to the field (e.g. the SEL button will put the hours into that field, and will zero out the MEL field). There is a "Check Time" button that you can use to help validate your numbers, but please continue to be dliligent about your time keeping. Pilot Buddy doesn't check for every possible data error.
The Log Book tab can be used to view your total logged time. This uses the information from the Settings tab as the starting point, then adds each flight in Pilot Buddy to the total. Note: Total Hours is always calculated as Day Hours + Night Hours. Be sure that the sum of these 2 values equal your total flight time.
Welcome to the Pilot Buddy Blog
Pilot Buddy is for Pilots, Student Pilots, and Flight Instructors. Plan, prepare, and execute your flights in an organized manner, have all the basic frequencies at the tip of your fingers (and easy to read), have a place to jot down the ATIS information, and record and track your flight hours.
Student Pilots, this is a great tool for you too! You will be able to plan and log all of your training flights and be able to track your progress toward meeting your training requirements. Also, Pilot Buddy provides you with built-in help for the basic communication calls you will be making during your flight (e.g. Clearance for taxi, Clearance to take-off, etc.). You will be able to use this to review and prepare for your flight.
Flight Instructors, this is a great tool for you to use to track your daily flight activity. You can use Flight Buddy to schedule your flights and track your flight hours with your students. During the flight training, there are handy counters for counting the number of landings and approaches the student has made (just press the button to increment the Landing or Approach counters). No more dialing in the number of landings on Nav-2!
Subscribe to:
Posts (Atom)